Tuesday, May 24

Chewy Oatmeal Raisin Cookies

At work we recently started carrying some gluten-free muffins from a local gluten-free bakery. Before we decided to order, the baker gave us a few samples of various baked goods to try. Lets just say, it was very impressive. The coffee cake melts on your tongue and the muffins are moist and sweet like you wouldn't expect. What really made my mouth water were the oatmeal raisin cookies - they were chewy yet crunchy and they contained the perfect amount of raisins, with a light hint of cinnamon. Absolutely delicious!

After thinking about chewy delicious oatmeal cookies every day since, I finally came up with my own. Here is my very non-gluten-free recipe for chewy oatmeal raisin cookies:


Chewy Oatmeal Raisin Cookies

1/2 cup all-purpose flour
1/2 cup whole wheat flour
1/2 teaspoon cinnamon
1/2 teaspoon baking soda
1/2 teaspoon salt
2 cups rolled oats
1 cup raisins
10 tablespoons butter
1 cup brown sugar
1 egg
1/2 teaspoon vanilla extract

- Preheat the oven to 350 degrees.
- In a small bowl combine both flours, cinnamon, baking soda, and salt.
- In the bowl of your stand mixer beat the butter and brown sugar together.
- Add the egg and vanilla extract to the butter/sugar mixture and beat until combined.
- Slowly add the dry ingredients in, followed by the oats and raisins.
- Using a spoon or a cookie scoop if you have one, place balls of dough 1" apart onto your cookie sheet and flatten them down with your fingers.
- Bake the cookies 12 - 15 minutes, until the edges are golden brown.
- Let them cool on the cookie sheet for at least 5 minutes before moving them to a cooling rack to cool completely.
- Enjoy!


Wednesday, May 11

Plant Friends!

When we moved out here (almost a year ago now!!) we brought three plants with us that I'd already had for a couple of years, meagerly growing near the only window in my dark basement room. Sadly, only one of them survived the move. We had every intention of buying more plants, but every time we'd go looking for some nothing ever caught our eyes. Until yesterday!

Apparently yesterday was a very good day for house-plant-hunting because after a trip to Lowes, Home Depot, and Ikea, we came home with four new house plants!


Now our lonely Dracaena marginata, the plant on the floor there, has some new friends!
(from left to right) a Money Tree, an Aloe Vera plant, a colorful Fittonia, and a lovely bonsai tree!


close-up of the bonsai; we love the 'S' that the trunk makes.


close-up of the colorful Fittonia leaves


We still intend to get some more plants to help fill up the space, but for now we're happy with these new four. Also, the gnomes probably feel a little bit more at home now too.

Wednesday, May 4

Keeping Things Organized

It took me almost a year but I finally got my side of the closet organized. Honestly, I don't know what took me so long, especially being the obsessive-compulsive kind of person that I am! Our bedroom closet has these wonderfully built-in shelves, but I wasn't utilizing them to the best of my abilities. I think I was still bitter about having to leave my wonderfully-built-to-my-needs closet at my parents' house behind (I mean seriously, have you seen IKEA's closets?!) - there was a place for everything!

The big push was when I saw the closet clean-up Sherry did over at Young House Love a couple of weeks ago. Her various bins and methods of storage inspired me to go to Target and buy a couple bins of my own. I finally got to the actual organizing part last Sunday while Shawn was at work.

The whole process took me about two hours, on and off. Of course, halfway thru project organization I realized that I completely forgot to take any 'before' photos of the closet, so I only have some 'after' photos to share. Oh well, my bad. Just imagine the same space, minus the fabric bins, with piles of various clothing on the shelves to the left of the hanging rack, bags of to-be-donated clothing on the shelf above the rack, and the shelf with all my jewelry had necklaces and things strewn about all over the place. A little sorting, hammering, and folding and a few hours later the closet looks like this:
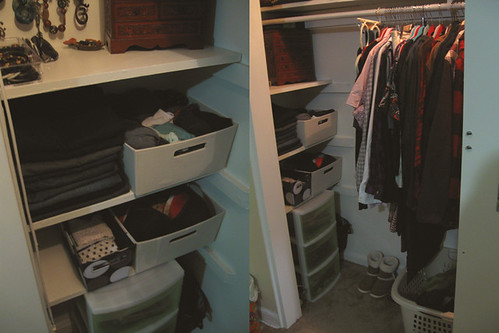

New storage - yay!

I was originally storing all of my undergarments in that little green drawer unit that's underneath the built-in shelves, but it occurred to me that I needed to access those things on a more regular basis than my 'lounge' clothes that were taking up space on the built-ins; so I put all my undergarments in the new fabric bins I bought, and I stored away all of my tank tops, funny t-shirts, and pj/sweat pants in the green drawers. This keeps the mess on the shelves down, and hides all the clothes I don't need to see on a regular basis.


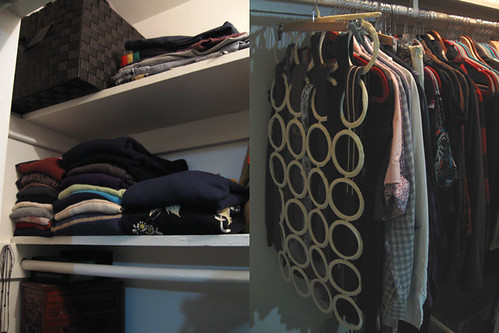
Sweaters, shorts, and hangers - oh my!

I took all the bags of to-be-donated clothing off the top shelf (they still haven't been donated yet, but at least they're no longer taking up space in our closet) and I moved all of my warmer weather clothing up top - my long sleeved shirts, sweaters, and bulky sweatshirts. The bin on the top-most shelf contains all my sports clothing and extra purses, and the pile next to it is all my shorts, since it's still not really warm enough to wear any of those yet. As far as the clothing on the hangers goes, I hung up all of my button-down shirts, skirts, dresses, and jackets, and stored all my belts on that nifty circle hanger from IKEA.


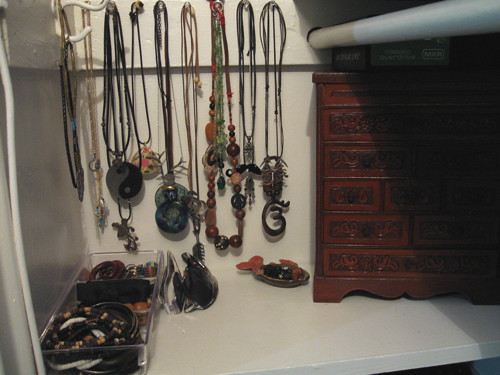
Jewelry all hung up and stored neatly, with plenty of room left over.

I think my favorite part of this whole re-organization process was my jewelry shelf - I hammered pins into the molding from which to hang my necklaces.... all 20+ of them. I honestly didn't realize I have quite that many necklaces! I guess that's what I get for finally organizing everything. I also bought a 3-compartment tray to store all of my earrings, bracelets, and various little knick-knacks.

Yay for complete closet organization! It has definitely helped me these last few days- putting an outfit together has never been so easy! And since we're already on the topic of style-related-things, I'm going to talk about my hair...

My bangs finally grew out to a more manageable length, so I've been spending a little time playing around with various hairstyles every morning. Lately I've been a fan of the ponytail flip, mostly because I'm getting sick of sporting a regular ole ponytail or bun all the time. I've also taught myself how to french braid! (only the front of my hair though, and it's still rough... I don't know if I'll ever be able to cleanly braid the back of my head.)

Shawn laughs at the amount of time I've been spending in front of the bathroom mirror lately, but there are a couple of more complex hairstyles I can't seem to get down quite yet: heidi braids, the fishtail, and these little twists. But there is one twist-and-pin style that I've finally succeeded at!


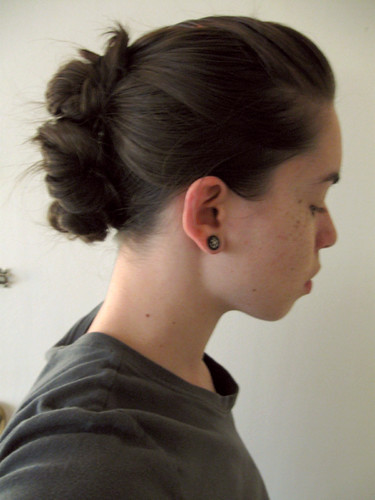
(see the tutorial at Hair Romance)

I actually did the twist-and-hairtie, because bobby pins just can't seem to stay put in my hair. Mostly I'm just proud of myself because I spent a decent amount of time trying to figure out what initially appears to be a fairly simple hair style, but proves to be something much more complicated (for me, at least). The twists would end up too high on my head, or one way larger than the rest, or they just wouldn't even stay put at all. But after much messing around, I finally struggled my hair into submission. What? I'm a girl; I never said I wasn't girly.

If that was too much closet & hair-talk for you, well, boo-hoo. No apologies here. Just let me bask in the glory of my clean closet and hair-styling-success.

Tuesday, May 3

Netflix Lovin' & Sweet Treats

In case you haven't quite figured it out yet, we're huge fans of Netflix over here. Which is kind of ironic, actually, considering the fact that when Shawn and I first met he was working at the local video store and he absolutely abhorred the thought of Netflix, whereas I was preaching about Netflix to everyone who would listen (way before they even started their amazing Instant Queue feature... my parents were early-Netflix customers). It just goes to show you how opinions can change as you grow (...and how the need for things like video stores dies out after a while).

Netflix is by no means sponsoring us or this post (but they totally should!), so the real question is - why are we such big fans? When we moved out here a year ago and did our cable company research, we just couldn't bear the thought of spending $100+ a month just to watch tv whenever we wanted (especially considering Comcast is the primary option out here - we've vented about them before though, so I'll spare you those details). Cable-less but in need of some visual entertainment, we opted for a Netflix subscription instead. At under $11 a month for one unlimited movie 'rental' at a time and unlimited access to the thousands of movies and tv shows in their Instant Queue 24/7, we would have been crazy to pick anything else.

So what if we can't watch 'real' tv? The only good thing on tv these days is Wayne Brady on Lets Make a Deal anyway!


We'd make deals with Wayne all day if he wanted us to...

But that's enough 'real' tv jazz - back to the Netflix love. They must really love us because they have all of our new & old favorite tv series on the Instant Queue:

* That 70s Show
* Futurama
* The Twilight Zone
* Scrubs
* 3rd Rock From The Sun
* 30 Rock
* Dexter (unfortunately only seasons 1 & 2 so no spoilers, please!)

...and our newest favorite series of all: PSYCH.


Shawn Spencer, Burton Guster, and the occasional pineapple.

Yes, we're a few years late on yet another bandwagon, shush. The show is hilarious. And smartly done. The episodes are an hour long, too, so that's always a plus for us. The main reason we watch it though is because the main character - Shawn Spencer - has such striking similarity to Shawn... it's uncanny. The personality traits are almost spot on and they even got his physical appearance right:


Shawn = Shawn?

...Shawn even has a button down shirt in that same pattern and colors. Strange. We're still trying to figure out how they got a hold of all of Shawn's shirts, thoughts and quirks.

But enough about that; now that I've proclaimed our love for Netflix and our new favorite (old) show, lets get into food mode.


Remember this peanut butter 'dip'? Did you know that it's not really a dip, it's actually a filling for something sweetly addictive? Check this out:


Pretzel peanut butter chocolate dipped yumminess!

Chocolate Peanut Butter Pretzel Bites


Ingredients:
1 cup creamy peanut butter
2 tablespoons butter, softened
1/2 cup powdered sugar
3/4 cup brown sugar
a bag of hard pretzels
4oz dark chocolate

To Make:
- In the medium bowl with a spatula or in the bowl of a stand mixer, beat the peanut butter and butter until combined.
- Scrape down the bowl, add sugars and beat until combined. You should be able to roll the mixture into balls without it sticking to your hands. If the dough is too sticky, add more powdered sugar until you reach a consistency that is easy to roll.
- Roll the peanut butter mixture into small balls, about 1 teaspoon of mixture for each ball, and place on a parchment-lined baking sheet.
- Sandwich the balls between two pretzels and place in the freezer for 30 minutes.
- Melt the chocolate in a metal bowl over a pan of lightly simmering water. Stir occasionally until smooth, and remove from heat.
- Dip each pretzel bite halfway into the melted chocolate and place on the prepared baking sheet. Chill in refrigerator until chocolate is set.
- Enjoy at your leisure! These keep best in the refrigerator or freezer.

Careful, they may be addictive. I should add, it's a quick and easy recipe that makes a great snack while you're getting comfortable on the couch watching Psych... or whatever your pleasure is. If you dig peanut butter as much as we do over here, you'll thank me for this one.